Adding a Product
How to add a product:
Step 1.
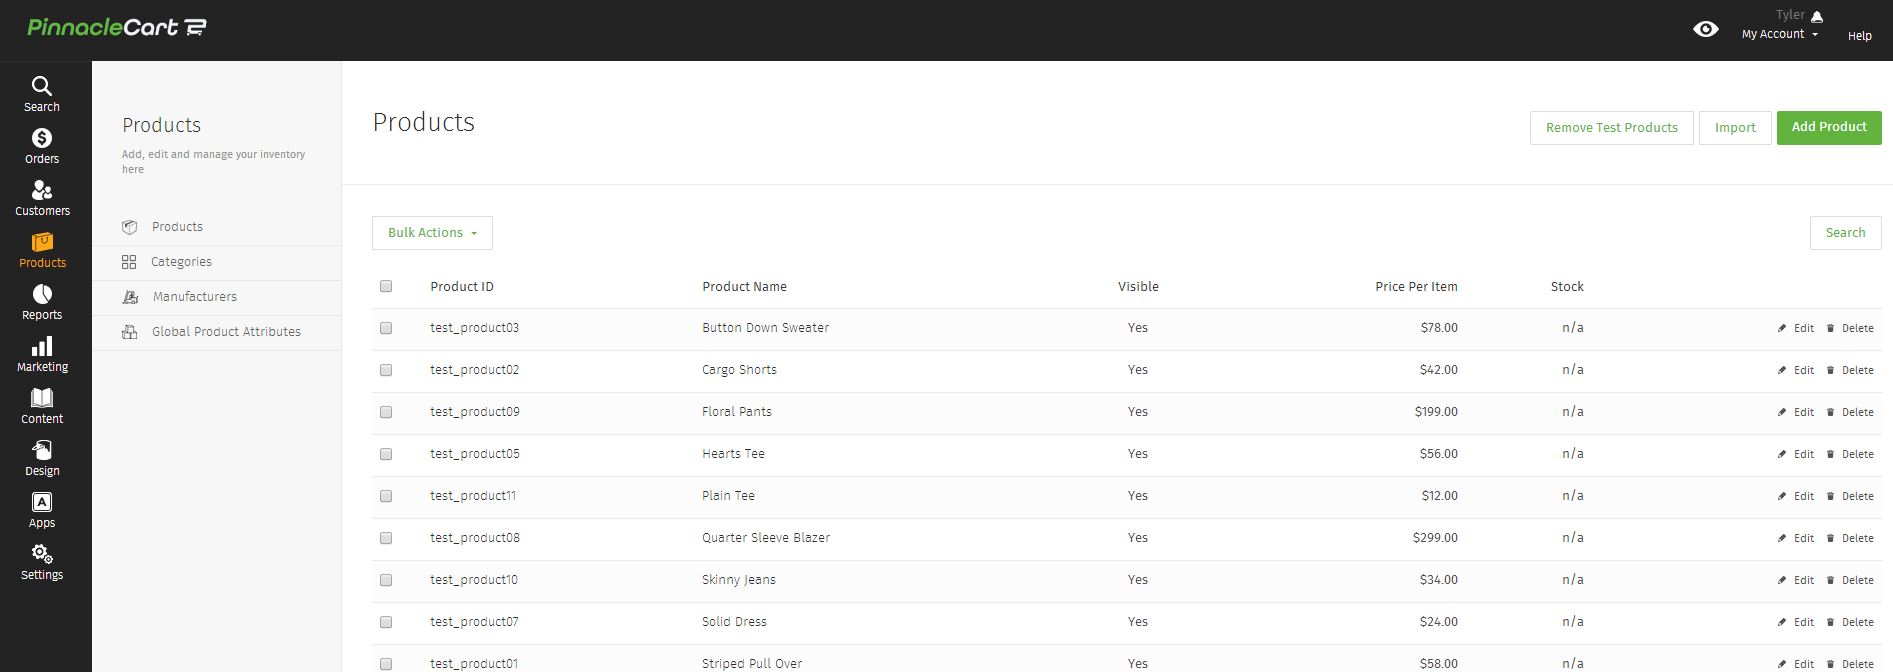
Click Products on the left hand side. If you have test products from the theme you chose, you can remove them by clicking Remove Test Products and then Confirm.
Step 2.
If you click the check all or check selected products and click Bulk Actions, you will have the option to Export or Delete products. Exporting will download your products into a .csv which can be used as a template for importing additional categories.
Click Add Product to add one new product. Click Import to bulk upload a spreadsheet of multiple products. See Bulk Importing Products for more info.
Step 3.
Product Name, ID, Price and Category are required fields.
Product ID is the unique identifier of your product. This is typically a shortened lowercase version of your product name, with underscores ( _ ) instead of spaces.
The first time you add a product, you can create a category at the same time. Just type the name of the intended category into that Category field. When you add future categories, you must choose from the existing category list. See Adding a Category for more info.
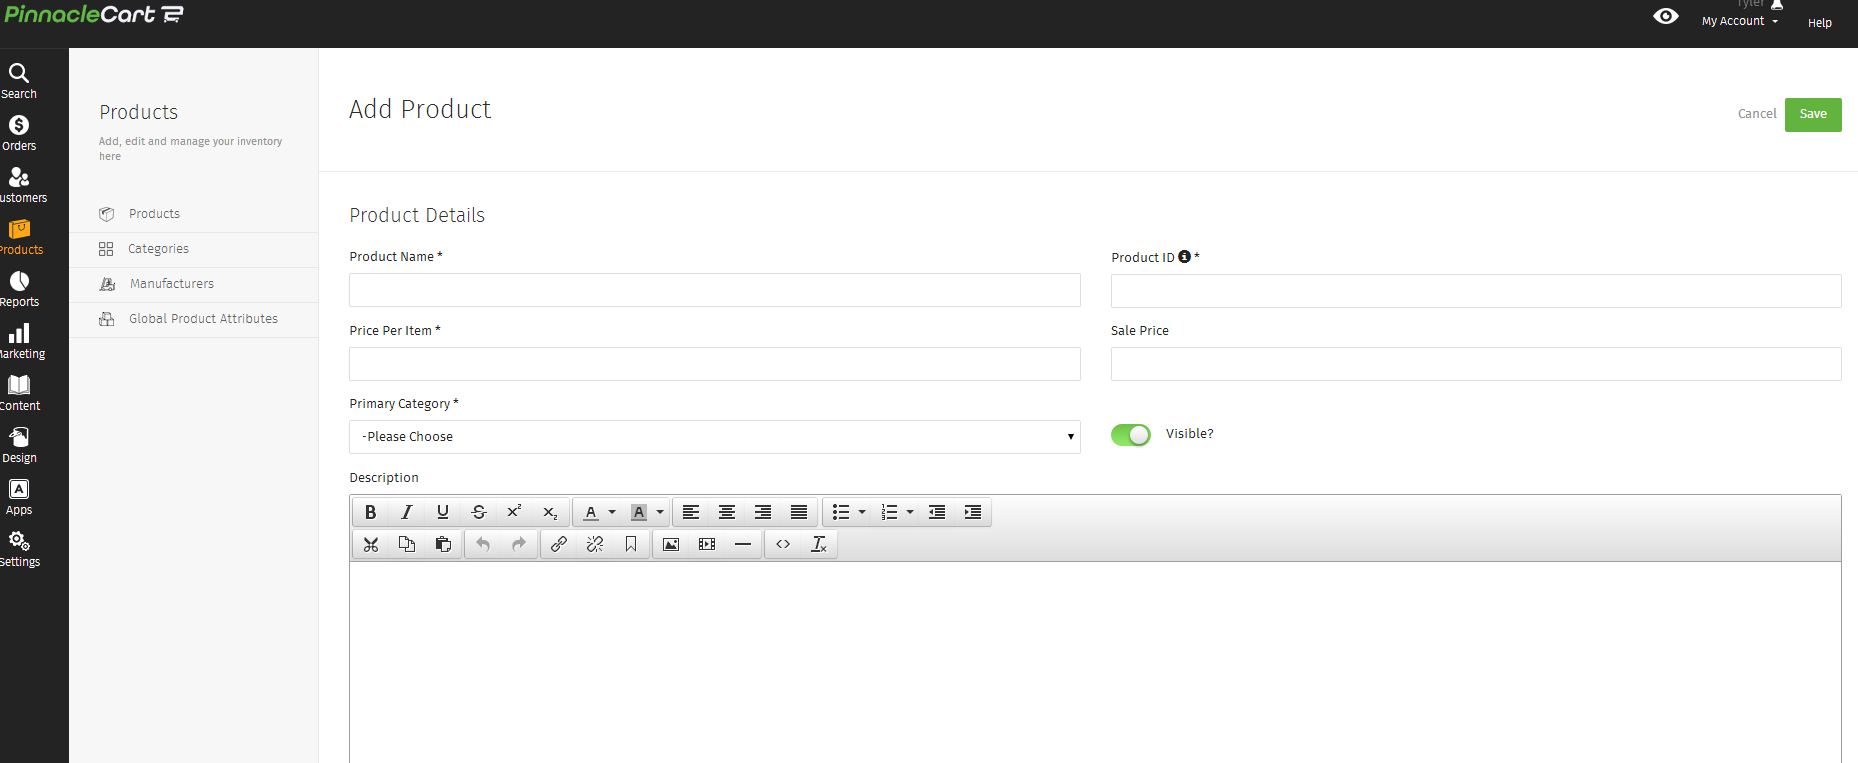
You can Save the product at this point, or continue adding data to it.
Show on Storefront? determines if the product is available for purchase by your customers. Disabling this options makes the product unsearchable via the front end of the website.
Description is the product description which will show on the product page. This can be edited via a WYSIWYG Editor. See Using the WYSIWYG Editor for more info.
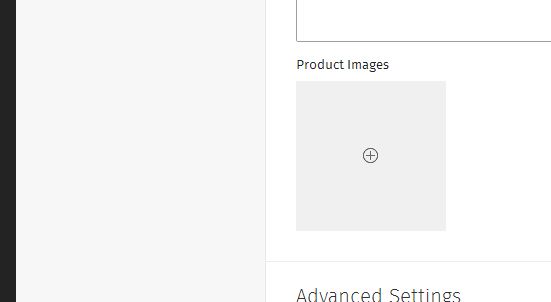
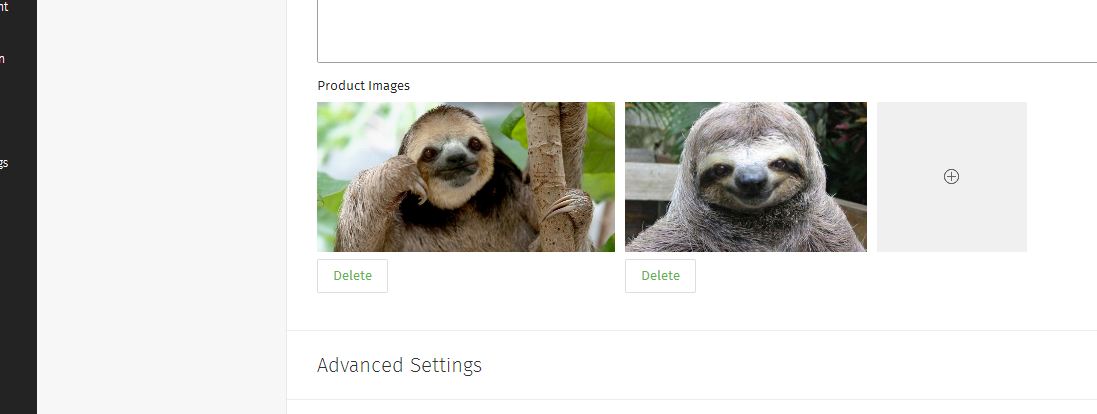
Adding a Product Image.
Click the grey box with the plus symbol in the middle to add an Image. This will browse your computer where you can locate the image. The first image selected will be the primary image. All images selected afterward will be secondary images. If the first image is deleted, the next image in line will become the primary image.
Advanced Settings.
Product Type is used to set what type of product you’re selling. Tangible is a physical product. Virtual is a subscription based product such as services. Digital is a downloadable product such as a .mp3, .pdf, or software.
Order of Appearance is for sorting of products on category pages. This is dependent on having List Products By set to Best Match (Priority) on Catalog Settings. See Catalog Settings for more info.
Item Weight is used for real-time shipping. Item Width / Length / Height has no affect on shipping.
Free Shipping for this product will override all other shipping options in the cart and force free shipping on this item.
With Taxable Product enabled, you will be able to assign a tax class if normal cart taxes are enabled. If Avalara or Exactor are enabled, you will see options to use their settings. See How to Enable Taxes, Avalara Tax and Exactor Tax.
Secondary Categoriess are to assign your product to other categories on the site. For example, a pair of shoes may be assigned to Shoes as the Primary Category and Clothes as a Secondary Category.
Minimum / Maximum Quantity in Order is used to limit the amount the item can be purchased on one order.
Inventory Tracking Options allows you to track inventory. See Setting up Inventory on Your Products for more info.
Search Engine Optimization.
Here you can set the Meta Title and Meta Description for your products. This is for SEO purposes and will be how the product is displayed in a search result.
The Meta Title will also be the text that shows on your browser tab.
You can also edit the Product URL to customize it. This is for advanced SEO and should only be changed by advanced users.
Recommended.
This is where you may add a Product Family to a specific product. The other products in this family will be displayed on the product page on the front of your website. To add, click the Product Family on the left side and select Add. To remove, select the Product Family from the right side and click Remove. See Recommended Products fore more info.
Editing a product:
After you’ve saved a product, you can click on it from the Product Page list to edit it. You will then be presented with additional options.
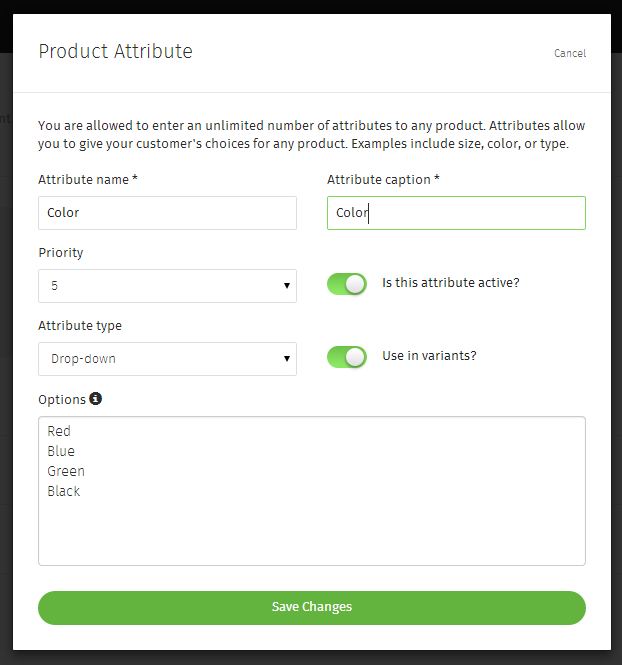
Attributes.
Attributes allow you to offer different options for your product. See Adding Attributes to Your Products for more info.
Variants.
Variants allow you to add Sub IDs to attributes. You cannot add a variant until you’ve created an attribute. This is also used for tracking inventory by attributes.
See Setting up Inventory on Your Products for more info.
Product Promotions.
Product Promotions allow you to offer a free product with the purchase of this product.
Minimum number of this product (X) sets how many of this product needs to be purchased for the promotion to take affect. For example, if set to 2, your customer would need to purchase two of this item to get the free product you’re offering,
Click Add Product Promotion to add one.
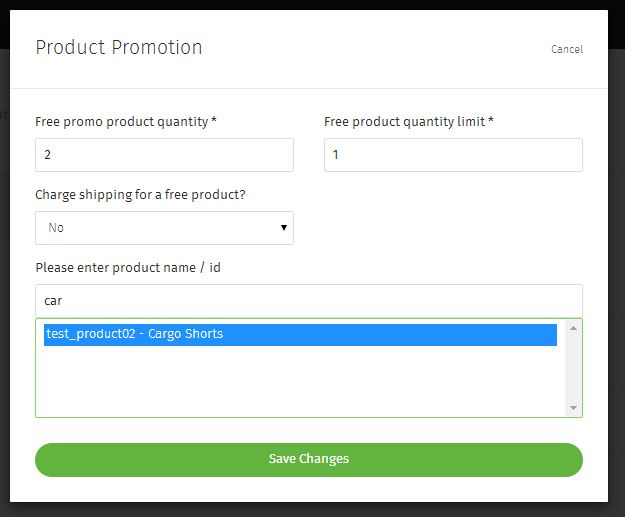
Free promo product quantity sets how many of the free product you will be giving with the purchase of this item.
Free promo product quantity sets the limit on how many of this free product they can get on one order. For example, if they buy 2 of your product, do you want them to be limited to just one of the free product?
Charge shipping for a free product? will determine of the free product contributes to the total shipping cost.
To add the free product, type the product name or product ID in the Please enter product name / id field. It will automatically pop-up in the list below for you to click and select it. Click Save Changes to add the product promotion.
Quantity Discounts.
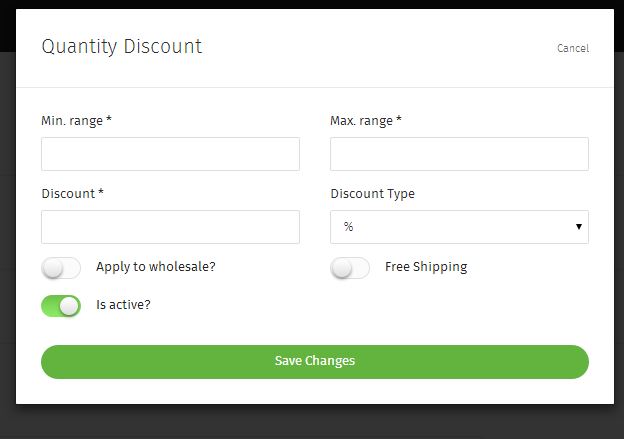
Quantity Discounts sets a discount on the product when a certain quantity is ordered. An example would be buy 2 get the the third for 50% off.
Min. range is the minimum amount needed to receive the discount. In the above example, this would be 3.
Max. range is the maximum amount in the range. So again, in the example above, this would also be 3. If you wanted any amount of 3 to be discounted, then you would want to set a very high number, such as 1000000.
Discount would be the amount off for the discounted item. In the example, this would be 50, and the Discount Type would be %. If you were to set a specific dollar amount off, such as $3, then Discount would be 3 and Discount Type would be Amount.
Apply to wholesale? allows you to set whether your wholesale customers receive this discount as well.
Free Shipping allows you to set the shipping to free when a certain quantity is ordered.
Is active? allows you to turn this off or on. Click Save Changes to apply.
Recurring Billing.
Recurring Billing allows you to setup your product to be billed in multiple increments over time. For more info, see Recurring Billing Explained.
QR Codes.
QR Codes are like bar codes. They are used on printable marketing. When you scan a QR code from a device such as a tablet or smart phone, it will link to a webpage about that content. An example would look like: 
You must first enable QR codes under Marketing for them to show as an option on products. See How to Add QR Codes for steps on how to do this.
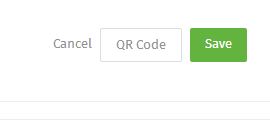
To add to your product, click QR Code at the top right.
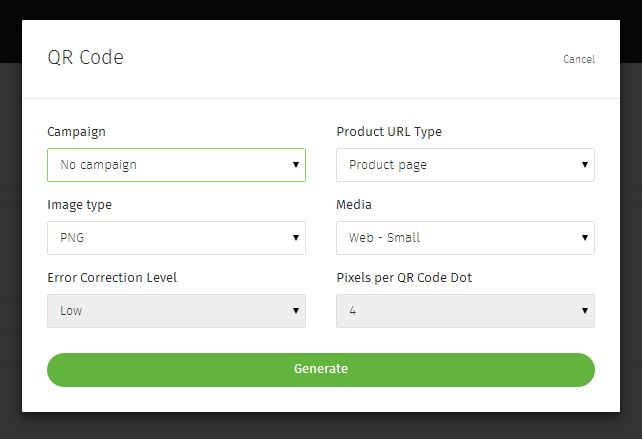
If you created a Campaign under Marketing, you can select it from the Campaign drop-down menu. This allows you to track it in reports.
Product URL Type allows you to set how the QR code links to your product. Product Page will just take users to that page. Add product to cart will add the product and take them to the cart page on their device.
Image type allows you to choose .png, .jpg or .gif formats for the QR code.
Media allows you to select what you intend to use the QR code on, such as a Big Print Ad. This also determines the Error Correction Level and Pixels per QR Code Dot.
Click Generate and a QR code will be generated along with the URL it will use.
Related: Bulk Importing Products
Related: Adding Attributes to Your Products
Related: Setting up Inventory on Your Products
Related: Recurring Billing Explained
Related: Digital Products
If you didn’t get your question answered, please contact the Pinnacle Cart Support Team. To submit a ticket, go to the My Account drop-down menu at the top right of the admin area and select Support.
0
0